How to make sourdough starter
How to make sourdough starter It's a question that resonates among artisanal cuisine enthusiasts, eager to create bread that exudes tradition.
Announcements
This process, rooted in centuries of history, transforms flour and water into a living yeast, capable of giving bread complex flavors and a unique texture.
It's not just a technique, but a journey that combines science, patience, and creativity, perfect for those who want to rediscover the value of homemade food.
In 2025, with the boom in home baking, learning how to make sourdough starter It's a skill that conquers hearts and palates.
This guide will walk you step by step, with practical advice, authentic examples, and tricks to avoid mistakes, making your sourdough starter a masterpiece.
Announcements
Get ready to get your hands dirty: your perfect bread is closer than you think!
What is sourdough starter and why is it special?
Sourdough is a live culture of wild yeasts and lactic acid bacteria that ferment flour and water, creating a natural leavening agent.
Unlike brewer's yeast, it offers deep flavors, a crunchy crust, and a honeycomb crumb, typical of artisanal bread.
According to a 2023 Slow Food Italy report, 65% of Italian bakers prefer sourdough for its superior quality.
Learn how to make sourdough starter it means embracing an ancient art, which transforms simple ingredients into something extraordinary.
Furthermore, sourdough bread is easier to digest and keeps longer, a plus for your everyday cooking.
Its uniqueness lies in the biodiversity of its microorganisms, which vary depending on the flour and the environment in which it is created.
A friend, Luca, noticed that his yeast, made in the countryside, had fruity notes compared to the one made in the city.
This living process makes each sourdough starter unique, like a fingerprint that reflects your environment and your care.
Choosing the right ingredients
To create a sourdough starter, you need quality flour and water: they are the basis of everything.
Opt for organic flour, type 0 or wholemeal, rich in nutrients that feed microorganisms.
The water must be non-chlorinated; tap water, left to stand for 24 hours, is perfect.
A common mistake is using refined flour: a friend, Sofia, failed because her flour was too low in nutrients.
Invest in quality ingredients, because sourdough starter is like a garden: it only grows in fertile soil.
Don't underestimate the importance of water temperature: lukewarm, around 24°C, is ideal for stimulating microorganisms.
If you use whole wheat flour, add a teaspoon of organic honey in the first few days to speed up fermentation.
++How to make homemade stuffed ravioli
These details make the difference, transforming a simple dough into a lively and vigorous yeast.
The choice of container is equally crucial: use a clear glass jar, never a metal one, which can react with bacteria.
A 500ml jar is enough to get you started, but make sure it is clean and sterilized.
Small tricks like these ensure an ideal environment for your sourdough starter.
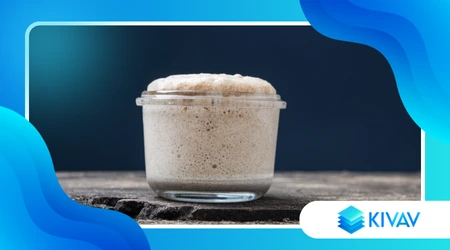
Starting the sourdough starter: the first step
Mix 100g of flour with 100ml of warm water in a glass jar, creating a thick batter.
Cover with a breathable cloth and leave to rest at 24-26°C for 48 hours.
This mix captures wild yeasts in the air and flour, kick-starting fermentation.
After two days, you will see bubbles: this is a sign that your yeast is coming to life.
Isn't it exciting to see nature work before your eyes?
During the first 48 hours, do not touch the jar: the microorganisms need stability to colonize the dough.
If you live in a cold place, place the jar near a gentle heat source, such as a router.
A friend, Clara, used this technique and her yeast started off great in just three days.
Check the smell: it might be pungent at first, but don't worry, it's normal.
++How to Cook a Creamy Parmesan Risotto
If after 48 hours you see no activity, discard and start again, perhaps changing the flour.
Patience is essential: each yeast has its own rhythm, like a musician tuning his instrument.
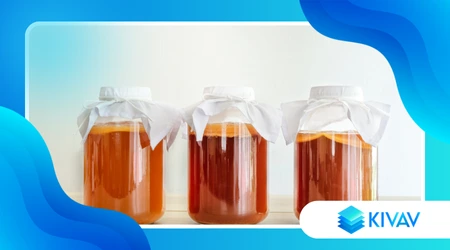
Refreshments: Feeding Your Yeast
After 48 hours, discard half of the dough and add 50 g of flour and 50 ml of water.
Repeat this “refreshment” every 24 hours for 7-10 days, keeping the temperature constant.
Refreshments strengthen the microorganisms, making the yeast more active and stable.
A common mistake is skipping a refreshment: Laura, a friend, did this and her yeast turned sour.
Keep pace and watch your yeast develop a fruity aroma.
To simplify, mark each refreshment on your calendar: consistency is the key to success.
If you notice a crust on the surface, carefully remove it before chilling: it is just dehydrated flour.
Over time, yeast will become more predictable, like an old friend you know well.
One trick is to weigh the empty jar: this way you'll know exactly how much yeast to discard.
++Kitchen hygiene and safety techniques
After each refreshment, mix well to oxygenate the dough, stimulating the growth of the yeast.
These details transform a seemingly simple process into a foolproof routine.
Refreshment Table: A Practical Guide
| Day | Flour (g) | Water (ml) | Rest time | Notes |
|---|---|---|---|---|
| 1 | 100 | 100 | 48 hours | Start of fermentation |
| 3 | 50 | 50 | 24 hours | First bubbles |
| 5 | 50 | 50 | 24 hours | Sweeter smell |
| 7 | 50 | 50 | 24 hours | Visible growth |
| 10 | 50 | 50 | 24 hours | Ready to use |
When is the sourdough starter ready?
After 7-10 days, the yeast should double in volume within 4-6 hours of refreshing.
The smell will be fruity, never pungent, and the consistency soft, similar to a mousse.
Do the float test: a teaspoon of yeast in water should float.
This moment is like seeing a seed become a plant: your work has borne fruit.
Now you can use it for bread, pizza, or focaccia: your culinary arsenal has just been enriched!
If the yeast does not double, continue refreshing for another 2-3 days, increasing the flour to 60 g.
A friend, Matteo, had success adding a pinch of rye flour to stimulate activity.
Every yeast is unique: listen to its signals and adapt the process to its needs. To confirm the strength, mark the yeast level with a rubber band after refreshing.
If it rises quickly, it's ready; if not, give it more time. This attention to detail turns a weak yeast into a powerful ally.

Practical example: your first bread
Take 200 g of active sourdough starter, 400 g of flour, 250 ml of water and 10 g of salt.
Knead for 10 minutes, let it rise for 12 hours, then bake at 220°C for 40 minutes.
The result is a golden crust and a honeycomb crumb, perfect for a home-cooked dinner.
The first time I tried it, the scent filled the house: an unforgettable memory.
Serve it with extra virgin olive oil and rosemary for a complete sensory experience.
++Cut vegetables like a real chef
For a more rustic bread, use wholemeal flour and reduce the water to 230 ml.
Let it rise in a wicker basket for a traditional shape.
These touches add character, making each loaf a little work of art.
If the bread is too dense, increase the hydration to 65% in the next test.
Bread making is an art that is refined with practice, like sculpting marble. Record every attempt: it will become your personal guide to ever-better loaves.
Maintenance of the sourdough starter
A well-cured sourdough starter can last for years, even generations.
Refresh it every 2-3 days at room temperature or weekly in the refrigerator at 4°C.
Before using it, bring it back to room temperature and refresh it twice.
It's like a pet: it demands attention, but repays with loyalty. Neglecting it weakens it, so plan your routine carefully.
If you store it in the refrigerator, use an airtight container to avoid contamination. A friend, Giulia, forgot about her yeast for a month: it was still alive, but weak.
Refresh it several times to bring it back into shape: the resilience of sourdough starter is amazing.
For short trips, leave it in the refrigerator without refreshments for up to 10 days.
Upon returning, refresh it twice a day for two days to revive it. This flexibility makes sourdough starter a practical and reliable kitchen companion.
Common mistakes and how to avoid them
Avoid metal containers: microorganisms dislike reactive surfaces. Temperatures above 30°C or below 20°C slow down or damage the yeast.
Marco, a friend, used water that was too hot, "cooking" his yeast: a disaster! Don't be discouraged if you make a mistake: every mistake is a valuable lesson.
Start over slowly, following the advice in this guide.
Another mistake is using too much flour in refreshments, suffocating microorganisms.
Respect the 1:1 proportions (flour:water) for a perfect balance.
If the yeast smells like acetone, refresh it twice a day for 2 days.
Don't throw away the yeast if it seems stale: sometimes all it takes is a change of environment.
Move the jar to a warmer area or use a different flour. Experimentation is part of the process, like finding the right shade in a painting.
The art of sourdough: a living metaphor
Create how to make sourdough starter It's like composing a symphony: each refreshment is a note that builds the final harmony.
It's not just chemistry, but poetry, which connects you to nature and history.
Every bubble is a breath, every loaf a story of your dedication.
Isn't this the true value of artisanal cooking? Sourdough teaches patience, care, and respect for the rhythms of nature.
Think of yeast as a dialogue with microorganisms: you provide food, they provide life. This symbiotic relationship is what makes the process so fascinating.
Every time you knead, you are writing a chapter in your culinary history.
Beauty also lies in imperfection: one loaf of bread will never be identical to another.
Embrace this uniqueness, like an artist embracing the nuances of her work. Sourdough is a journey, not a destination: enjoy every step.
Creative example: sourdough starter with spelt flour
For an original yeast, use wholemeal spelt flour: mix 100 g of flour with 100 ml of water.
Follow the standard refreshments, but you will notice a rustic, earthy aroma.
After 10 days, prepare a focaccia with rosemary and coarse salt: a triumph of flavors.
I served this focaccia at a dinner with friends: it disappeared in a few minutes!
Spelt flour adds character, perfect for those who love authentic flavors.
To enhance the spelt, add a teaspoon of barley malt to your refreshments. This trick intensifies the flavor, making the yeast even more versatile.
Try it for seeded bread too: the result will be unforgettable.
If your spelt yeast grows slowly, use 26°C water for refreshments. Experimenting with alternative flours is a way to customize your yeast.
Each attempt brings you closer to a recipe that speaks to you.
Long-term storage
For longer breaks, dry the sourdough starter: spread a thin layer on parchment paper. Let it air dry, crumble it, and store it in an airtight container.
To reactivate it, mix 50 g of powder with 100 g of flour and 100 ml of water. This method is like pausing a movie: you can resume whenever you want. It's perfect for those who travel or have a busy life.
Drying takes 2-3 days in a dry, ventilated place. A friend, Anna, dried her yeast before a trip: it worked perfectly.
Store the crumbs in the refrigerator for even longer shelf life.
If you don't want to dry it, freeze the yeast in small portions for up to 3 months.
Defrost it slowly in the refrigerator and refresh it twice before using. These options make sourdough starter incredibly convenient.
Sourdough in 2025: A Living Trend
Today, how to make sourdough starter It's a global phenomenon, amplified by social media. On Instagram, home bakers share perfect loaves, inspiring millions.
The pandemic has rekindled a love for DIY cooking, and sourdough starter is a symbol of resilience.
In 2025, online courses and books on artisanal baking are more popular than ever.
Join the movement: a homemade loaf of bread is a small revolution.
Online communities, like Telegram groups, offer support and creative ideas. I learned a trick for slow proofing from one group: amazing results!
These platforms are a goldmine of inspiration for beginners.
Even high-end restaurants are rediscovering sourdough. Many offer homemade bread, showcasing the Italian tradition.
This return to the origins is an invitation to rediscover the pleasure of authentic bread.
Conclusion: Your journey with sourdough
Learn how to make sourdough starter It's more than a technique: it's a journey that teaches patience and connection with food.
Every refreshment, every bubble, every loaf is a testament to your commitment.
In the chaos of 2025, sourdough is a return to simplicity, a way to slow down.
Grab flour, water, and a jar: start today and be amazed.
The smell of freshly baked bread will be your greatest reward. There's nothing more satisfying than creating something alive with your own hands.
Frequently Asked Questions
How long does it take to make a sourdough starter?
On average, 7-10 days with daily refreshments, but it can vary depending on temperature and flour.
Can I use gluten-free flour?
It's possible, but more complex: use rice flour and follow specific guides for gluten-free yeast.
My yeast smells like vinegar, is this normal?
A pungent smell indicates hunger: refresh twice a day for 2 days to rebalance it.
Can I keep sourdough starter forever?
With care, yes! Regular refreshments or drying will keep it alive for years.
What do I do with the leftover refreshments?
Use it for wraps, crackers, or pancakes—there are so many creative recipes online!